Elementary Overview
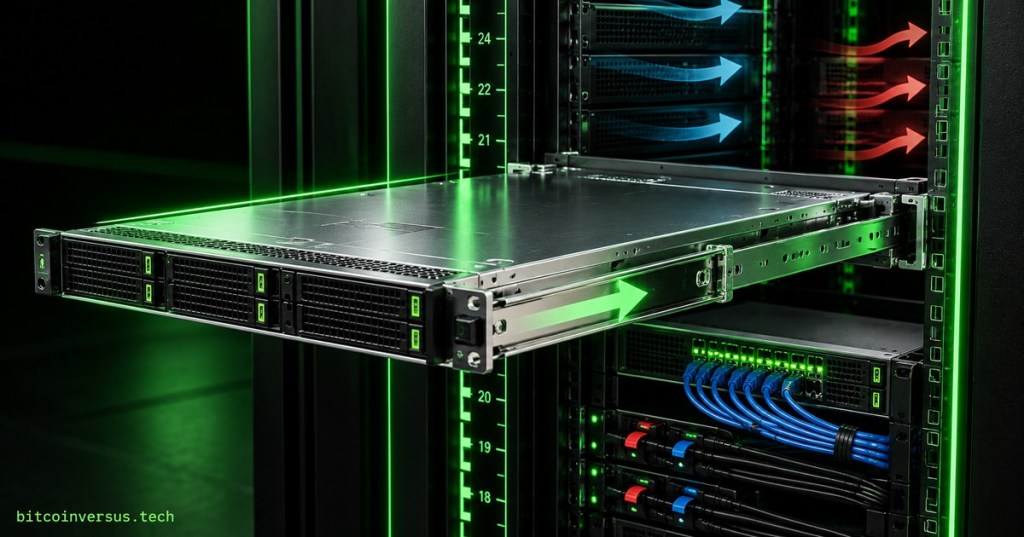
A server rack is a tall metal frame that lets many computers and network devices share the same organized space. A rack-mounted server slides onto rails, occupies a numbered amount of vertical space called rack units, receives power from a rack PDU, connects to the network through the structured-cabling system, and pulls cooling air through its front. Rack-and-stack work is therefore not just “put the server in the rack.” A technician has to place it in the correct U position, install the right rail kit, keep the airflow direction correct, connect the intended A/B power feeds and network ports, then prove that the machine boots and can be managed.
Start With the Work Order, Rack, and U Position
Before lifting hardware, confirm the rack identifier, cabinet side, intended U position, device name, serial or asset tag, rail-kit part number, and required service connections. A standard rack unit is 1.75 inches high, so a 1U server uses one numbered rack position and a 2U server uses two. Install heavy equipment lower when the site design allows it, and never assume an open space is available merely because it looks empty; it may be reserved for another device, airflow hardware, future capacity, or a cable pathway. The safety practices from OSDCTC.001 still apply: use the approved lift method, control sharp rail edges, protect hands, and get a second person or lift device when the equipment weight requires it.
Rails Must Be Level, Matched, and Fully Locked
A rail kit is part of the server’s mechanical support system. Both left and right rails must be compatible with the chassis, installed at the same U height, fully engaged in the front and rear rack posts, and locked according to the manufacturer procedure. If one rail is even one hole higher than the other, the chassis can bind, twist, or fail to seat. Extend sliding rails only as designed, keep the center of gravity under control, and do not force a server that stops halfway. Resistance usually means a rail tab, latch, alignment feature, or chassis pin is not correctly engaged. Once the server is seated, verify the front latches or retention screws and make sure the chassis can be serviced without striking adjacent equipment.
Protect the Front-to-Back Airflow Path
Most rack servers are designed for front-to-back airflow: cooler supply air enters through the server face and warmer exhaust leaves through the rear. The rack therefore needs to preserve the data-center cooling plan. Do not install a server backward, block fan intakes with loose cables, or leave large unused rack openings unsealed when the site requires blanking panels. Rack fronts should face the cold aisle and rears should exhaust toward the hot aisle. A correctly powered server can still overheat if recirculated exhaust reaches its inlet, which is why rack placement, blanking panels, cable routing, and containment are operational reliability issues rather than cosmetic details.
Connect A/B Power Deliberately
Dual-corded servers are normally connected so one power supply reaches the A-side rack PDU and the other reaches the B-side PDU. That design only provides useful redundancy when the two feeds are genuinely independent according to the facility architecture. Confirm receptacle type, PDU label, breaker loading, cable length, and PSU status LEDs before energizing the device. Do not cross-connect both power supplies to the same feed simply because the outlets are nearby. After power-up, verify that both supplies report healthy and, when the work procedure permits, confirm that the server remains available with one supply path removed or logically isolated. Power redundancy should be demonstrated, not assumed.
Route Network and Management Cables for Serviceability
The rear of a rack should remain readable after the installation is complete. Connect production NICs, management ports, console links, and any storage or fiber interfaces to the exact switch and patch-panel ports in the work order. Apply the labeling and bend-radius rules from OSDCTC.003. Use the manufacturer-approved cable management arm when required, but leave enough service slack for the chassis to slide out without pulling connectors. Keep network cables clear of hot exhaust, fan modules, PSU removal paths, and sharp rail edges. A clean rack is useful because a later technician can identify a failed link or replace a component without disconnecting the wrong cable.
Bring-Up Is a Verification Step, Not Just a Power Button
After the physical installation, verify the server as a system. Confirm both power supplies, fan state, front-panel health indicators, link lights, management-controller access, expected MAC or IP information, and the absence of hardware alarms. A BMC such as Dell iDRAC provides out-of-band management even when the operating system is not fully running, making it useful for checking inventory, temperatures, firmware state, event logs, and remote console access. Record the installed U position, rack, serial number, switch ports, PDU outlets, and management address in the site documentation. A rack-and-stack task is complete only when another operator can identify the device and the monitoring systems can see it.
Technician Rack-and-Stack Checklist
- Confirm work order, rack ID, hostname, asset tag, device model, and exact U position.
- Inspect the rail kit and verify compatibility with the rack and chassis.
- Install both rails at the same rack height and confirm all locks engage.
- Use the approved lift method and seat the chassis without forcing it.
- Secure retention latches or screws.
- Confirm server front faces the intended cold aisle.
- Install required blanking panels around unused U space.
- Connect PSU 1 and PSU 2 to the specified A/B feeds.
- Connect production, management, console, storage, and fiber links exactly as documented.
- Label both ends of every new cable where the site standard requires it.
- Route cables so rails, fans, PSUs, and service access remain clear.
- Power on and verify PSU, fan, NIC, BMC, and hardware-health status.
- Confirm management access and document rack/U, PDU outlets, switch ports, serial number, and IP information.
Exercises
- A 2U server is assigned U20–U21. Explain how you would verify the rail placement before lifting the chassis.
- Describe what could happen if both redundant power supplies are connected to the same PDU.
- Explain why unused rack openings can affect cooling.
- List five pieces of information that should be recorded after installation.
- Describe how you would distinguish a bad network patch from a server that never completed hardware initialization.
- Explain why cable slack is required when a sliding-rail server uses a cable management arm.
Knowledge Check + Answers
- How tall is 1U? 1.75 inches.
- Why must both rails be installed at the same U height? Uneven rails can twist, bind, or prevent the server from seating safely.
- Which direction do most rack servers move cooling air? Front to back.
- What is the purpose of A/B power? To provide independent power paths so one feed can fail without necessarily removing server power.
- What is a BMC? A baseboard management controller that provides out-of-band hardware monitoring and management.
- When is rack-and-stack complete? After the server is mechanically secure, correctly powered and cabled, healthy, manageable, documented, and visible to operations.
Elementary Conclusion
A server rack works like a very organized apartment building for computers. Each server gets a numbered space, rails hold it safely, cool air must reach its front, power has to come from the correct outlets, and network cables have to lead to the correct switch ports. The technician’s job is to make all of those relationships correct at the same time. If the server is mounted perfectly but both power cords go to the same failed PDU, it can go offline. If the power is perfect but the rails are crooked, it may be unsafe to service. If everything is connected but nobody records where it went, later troubleshooting becomes harder. Good rack-and-stack work therefore means the server is secure, cool, powered, connected, manageable, and documented.
BitcoinVersus.Tech
Advertisement
Editor’s Note:
We volunteer daily to keep the technical information on this platform verifiable. Readers who want to support the research can use the donation information published by BitcoinVersus.Tech.
BitcoinVersus.tech is not a financial advisor. This media platform reports on financial subjects purely for informational purposes.


Leave a comment